ESXi 6.5 Single USB Thumb Drive
I have a goal of booting an ESXi host from a single 32GB USB thumb drive. No other internal storage should be required for this firewall application. This is an ideal setup as there are no moving parts or cables to come unplugged. USB thumb drives are cheap and fast these days.
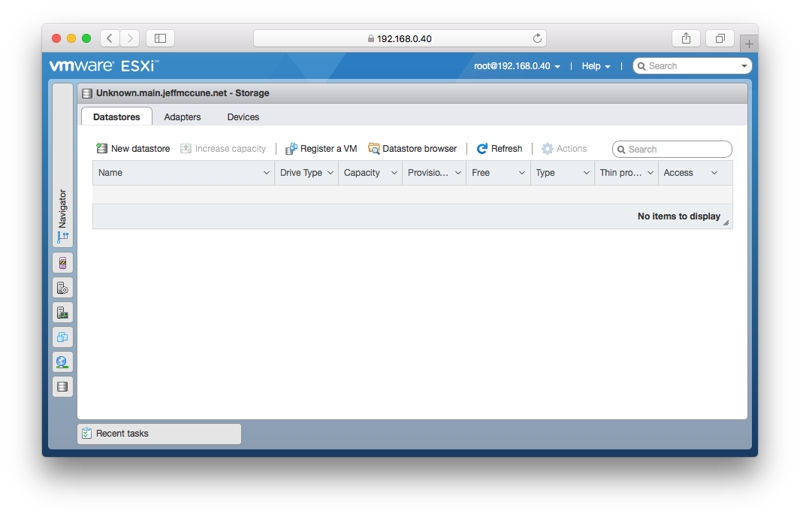
I was able to install ESXi 6.5 onto the USB thumb drive, but nothing shows up as an available data store for virtual machines. There’s a ton of free space on the USB stick. We can make use of this space with some partitioning magic.
I’m doing this all with a Mac OS X workstation. I’ll use a Ubuntu 16.04 VirtualBox instance to partition the USB stick. We’ll format the filesystem on the ESXi host itself.
First install, ESX onto the USB stick.
Shutdown the ESX host, remove the USB stick and insert into your Mac. Eject the disk from your mac so it can be passed through VirtualBox to Ubuntu 16.04:
sudo diskutil list
sudo diskutil eject disk1
To quickly get a Ubuntu desktop up and running, use vagrant:
mkdir ~/xenial
cd ~/xenial
vagrant init ubuntu/xenial64
Patch the vagrant file to get the GUI:
--- Vagrantfile.orig    2017-11-22 16:03:04.000000000 -0800
+++ Vagrantfile 2017-11-22 16:04:49.000000000 -0800
@@ -57,4 +57,8 @@
   #   vb.memory = "1024"
   # end
+  config.vm.provider "virtualbox" do |vb|
+    vb.gui = true
+    vb.memory = "2048"
+  end
   #
   # View the documentation for the provider you are using for more
Bring up the vagrant instance:
vagrant up
Shutdown the instance and add USB to the virtual machine:
vagrant ssh -- sudo shutdown -h now
Go into VirtualBox Settings => Ports => Add a USB EHCI controller. Add a filter
for the USB thumb drive. This is important, otherwise the USB thumb drive won’t
show up in the Ubuntu VM. If the USB thub drive doesn’t show up in the GUI,
make sure it’s been ejected from Mac OS X using diskutil eject prior to going
into VirtualBox settings.
Install the Ubuntu Desktop:
vagrant ssh -- sudo apt-get install -y --no-install-recommends ubuntu-desktop
Install gparted
vagrant ssh -- sudo apt-get install -y gparted
Set a password for the user ubuntu:
vagrant ssh -- sudo passwd ubuntu
Reboot again to get the desktop up and running.
vagrant ssh -- sudo shutdown -r now
Log in as ubuntu with the password just set. Open a terminal with ctrl +
alt + t.
Use sudo gparted to create a new partition in the free space. Make sure to create
it as unformatted, not the default of ext4.
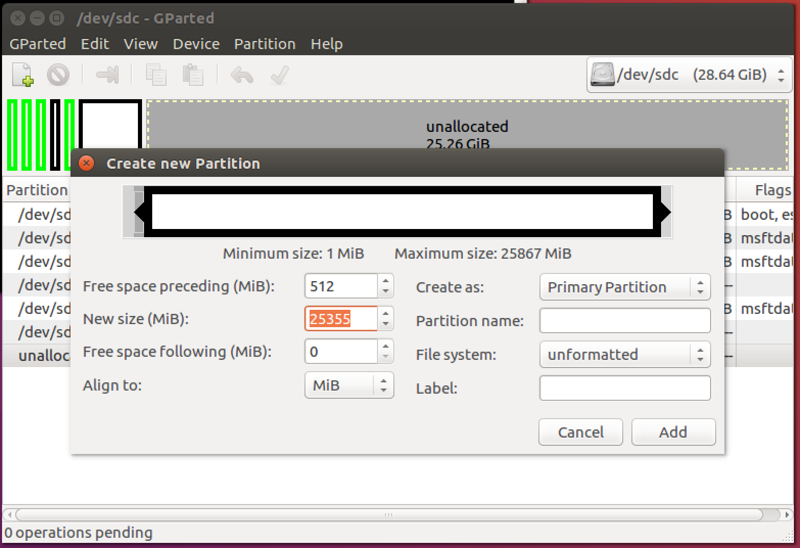
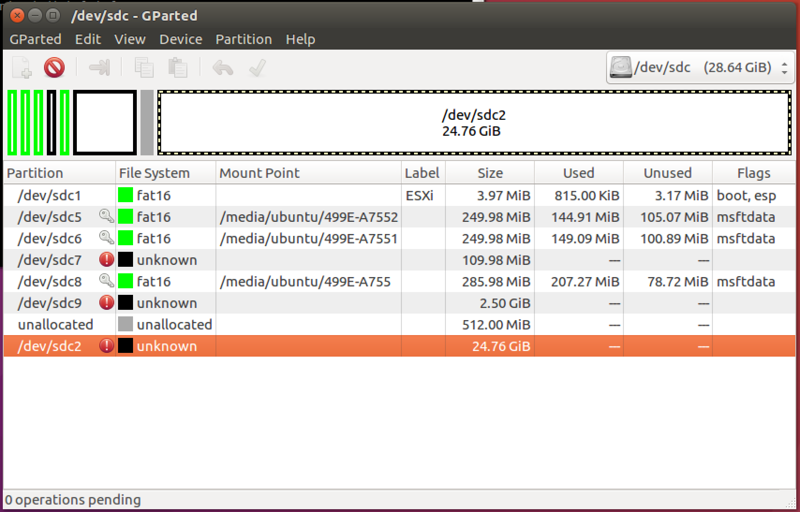
Note the partition number, it should be partition 2, e.g. /dev/sdc2.
Use sudo gdisk /dev/sdc to change the partition type to fb00. The sequence here is:
t2fb00wY
vagrant ssh -- sudo gdisk /dev/sdc
GPT fdisk (gdisk) version 1.0.1

Partition table scan:
  MBR: protective
  BSD: not present
  APM: not present
  GPT: present

Found valid GPT with protective MBR; using GPT.

Command (? for help): t
Partition number (1-9): 2
Current type is 'Linux filesystem'
Hex code or GUID (L to show codes, Enter = 8300): fb00
Changed type of partition to 'VMWare VMFS'

Command (? for help): w

Final checks complete. About to write GPT data. THIS WILL OVERWRITE EXISTING
PARTITIONS!!

Do you want to proceed? (Y/N): Y
OK; writing new GUID partition table (GPT) to /dev/sdc.
Finally, change partition 2 to partition 10 to avoid issues updating ESXi 6.5. The update process assumes partition 2 has not been created and will error out if present.
sudo sfdisk -d /dev/sdc > esxi.txt
cp -p esxi.txt esxi.txt.orig
Change esxi.txt as the following diff shows, moving partition 2 to 10.
--- esxi.txt.orig       2017-11-23 00:13:57.561990531 +0000
+++ esxi.txt    2017-11-23 00:15:35.566968530 +0000
@@ -7,5 +7,4 @@

 /dev/sdc1 : start=          64, size=        8128, type=C12A7328-F81F-11D2-BA4B-00A0C93EC93B, uuid=439DBC97-6DB2-4FD1-BDEA-A01FC9F26A49
-/dev/sdc2 : start=     8134656, size=    51927040, type=AA31E02A-400F-11DB-9590-000C2911D1B8, uuid=7661DD41-6B25-4ACA-9A7E-E68F07361B9E
 /dev/sdc5 : start=        8224, size=      511968, type=EBD0A0A2-B9E5-4433-87C0-68B6B72699C7, uuid=CC0591B2-6658-4A25-91CF-1A9765D239A5
 /dev/sdc6 : start=      520224, size=      511968, type=EBD0A0A2-B9E5-4433-87C0-68B6B72699C7, uuid=CDD8851F-3A51-47AD-80E1-F2D504197A8C
@@ -13,2 +12,3 @@
 /dev/sdc8 : start=     1257504, size=      585696, type=EBD0A0A2-B9E5-4433-87C0-68B6B72699C7, uuid=3119D6C6-3EEC-4970-9289-6128686849EB
 /dev/sdc9 : start=     1843200, size=     5242880, type=9D275380-40AD-11DB-BF97-000C2911D1B8, uuid=7A6D08A3-6E3F-488D-8F3B-36145382BA9F
+/dev/sdc10 : start=     8134656, size=    51927040, type=AA31E02A-400F-11DB-9590-000C2911D1B8, uuid=7661DD41-6B25-4ACA-9A7E-E68F07361B9E
Write the partition table back out to the USB drive:
sudo sfdisk --force /dev/sdc < esxi.txt
Check the partition table, make sure there is a partition 10:
sudo fdisk -l /dev/sdc
Insert the USB thumb drive back in the ESXi host and boot it back up. SSH in as root and check the partition table. There should be no partition 2 and you should see partition 10.
[root@esxi:~] partedUtil getptbl /dev/disks/mpx.vmhba32\:C0\:T0\:L0
gpt
3825 255 63 61457664
1 64 8191 C12A7328F81F11D2BA4B00A0C93EC93B systemPartition 128
5 8224 520191 EBD0A0A2B9E5443387C068B6B72699C7 linuxNative 0
6 520224 1032191 EBD0A0A2B9E5443387C068B6B72699C7 linuxNative 0
7 1032224 1257471 9D27538040AD11DBBF97000C2911D1B8 vmkDiagnostic 0
8 1257504 1843199 EBD0A0A2B9E5443387C068B6B72699C7 linuxNative 0
9 1843200 7086079 9D27538040AD11DBBF97000C2911D1B8 vmkDiagnostic 0
10 8134656 61456383 AA31E02A400F11DB9590000C2911D1B8 vmfs 0
Format the partition with vmkfstools -C vmfs5 -S USB.1:
[root@esxi:~] vmkfstools -C vmfs5 -S USB.1 /dev/disks/mpx.vmhba32\:C0\:T0\:L0:10
create fs deviceName:'/dev/disks/mpx.vmhba32:C0:T0:L0:10', fsShortName:'vmfs5', fsName:'USB.1'
deviceFullPath:/dev/disks/mpx.vmhba32:C0:T0:L0:10 deviceFile:mpx.vmhba32:C0:T0:L0:10
ATS on device /dev/disks/mpx.vmhba32:C0:T0:L0:10: not supported
.
Checking if remote hosts are using this device as a valid file system. This may take a few seconds...
Creating vmfs5 file system on "mpx.vmhba32:C0:T0:L0:10" with blockSize 1048576 and volume label "USB.1".
Successfully created new volume: 5a1614ce-846cd3c8-9b10-0cc47aaaf624
The partition now shows up in the datastore browser after a refresh.
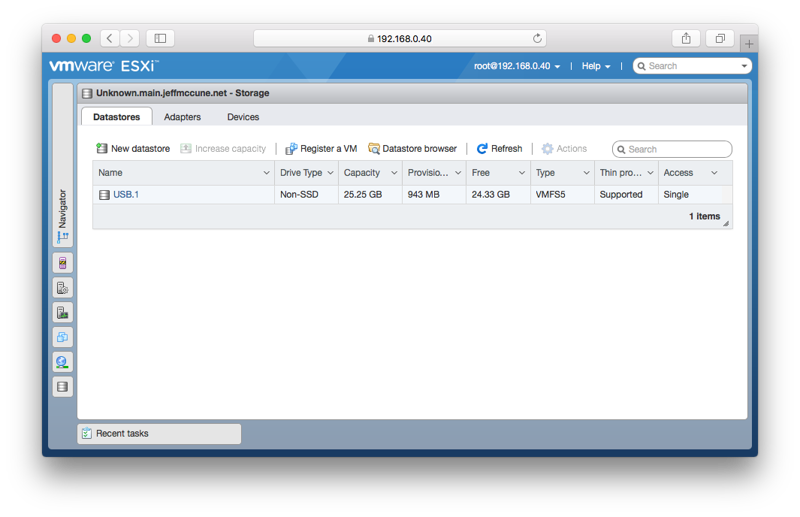
Configure swap, a persistent scratch location, and virtual machines on the same USB drive ESX is booting from, and enjoy!